Week 11 - APIs and CORS
Regardless of which APIs you are dealing with the process of building dynamic webpages with the data from the API will be pretty much the same.
- Wait for your page to finish loading
- Add event listeners to your interface that will let the user interact with your page
- Do you need the user to fill out a form before getting the data?
- Are you getting information from the querystring or hash value to add to the request?
- Does the API need any special querystring or header values like an API key?
- Do you need to register with the API for a key?
- Build a Request object that contains all the necessary information and send the request
- When the Response returns check the status code and content-type of the response.
- Extract the
text()orjson()from the response object. - Use a common reusable function for building your new HTML content.
- Does your new content need an event listener? Add it to the containing element.
- Do you need to embed things like ids in the HTML? Use
data-properties. - Which approach do you want to use for building the HTML?
createElement? HTML String?map()through Array? or<template>withcloneNode? - Is your new content replacing old content or being added?
- If adding new content, should it be at the top or bottom of the containing element?
Answer these questions and build your code so it runs generally in this order.
The way you organize this code can be done in a variety of ways, with or without modules. Namespaces are a good idea either way.
Uploading Data with Fetch
Section titled “Uploading Data with Fetch”When you need to send data from the browser to some web server (remote API), you need to package the information in a way that can be read when it gets to the server.
The data that you want to upload can be put into a few places.
- Cookies: Usually small identifier strings like a session id.
- Headers: One custom header for each value.
- QueryString: Name value pairs. Limited to ~2000 characters.
- HTTP Request Body: Any time you have a large amount of text, or files, or don’t want to show the value in the querystring.
Here are a few ways that the data can be sent in the body.
- JSON String
- A
www-form-urlencodedstring - A
FormDataobject - A plain text string
When you are creating forms in your HTML pages you can do the last 3 of these like this:
<form enctype="application/x-www-form-urlencoded" action="/endpoint" method="POST"></form><form enctype="multipart/form-data" action="/endpoint" method="POST"></form><form enctype="text/plain" action="/endpoint" method="POST"></form>Basically the encoding type and method attributes tell the browser how to format the information that will be send to the server. The action attribute defines the URL where the data will be sent.
If you need to upload a file then the method must be POST and the enctype must be multipart/form-data.
In JavaScript, we can create a FormData object and append name-value pairs of text or even append files. We can just set the value of the Request body to be the FormData object, or a JSON String, or a plain text string, or a x-www-form-urlencoded string. This last one means that you are writing all the data you want to upload to look like the QueryString. The full FormData notes are in week 10.
Whichever one of these methods you choose in JavaScript, you should add a Content-Type header to your Request as well. The code sample below shows all the different values for the header. Choose ONE of these.
let h = new Headers();h.append('Content-Type', 'plain/text');h.append('Content-Type', 'application/json');h.append('Content-Type', 'application/x-www-form-urlencoded');h.append('Content-Type', 'multipart/form-data');
let req = new Request(url, {  headers: h,  method: 'POST',  body: YourDataVariableGoesHere,});
By setting this header you are telling the web server how it should parse the data you are sending.
REST stands for REpresentational State Transfer. It is a term used to describe what we are calling AJAX or fetch. We are using HTTP requests to ask a web server to send us (a web client)
information.
REST needs there to be a client and a server.
The client makes the requests and the server sends the responses.
The State refers to the information, rather the current state of the information that you are requesting.
the Transfer is the sending of information between the client and server.
One very important aspect of the process is that neither side maintains a memory of previous requests and responses. We gain a lot of efficiency by the server not having to keep track of whether or not a particular client has made the same request previously. This lack of memory of state meant that HTTP was very durable and resilient.
When you make an HTTP Request, the request is broken up into small packets. Each packet is numbered and keeps a record of the address that it came from and where it is going. Not all packets have to follow the same path. Routers all over the world are constantly trying to find the most efficient way to get information from point A to point B.
When all the packets reach their destination they are reassembled in order.
Now, because there is no maintaining of history of requests on the server or client, it has lead to the development of lots of other services. There are session management techniques in all the server-side programming languages to let developers keep track of users. There are also Proxy Servers and CDN (content delivery networks) that cache copies of requests and distribute copies of files across different zones so that it will be more efficient when requests are made.
For example, Netflix does not have a single server that is waiting for requests for video files. They have redundant servers with copies of the content spread all over the world. When a video is trending more copies of that video file are transferred to the servers that provide content to the areas where the video is trending. This is an example of a CDN.
The MovieDataBase is a free API that you can use to get data about TV Shows, Movies, and Actors. The home page for the https://www.themoviedb.org/ site.
The API requires you to sign up for a developer key. The unique key that they give you allows you to make AJAX calls to the API to search for movies, get movie recommendations, get movie reviews, and lots of other images and information about movies.
Readme file about how to get started with theMovieDatabase.org API: Code Gist
TMDB Base URLs
Section titled “TMDB Base URLs”When you are making API calls to the data from TMDB then your URL endpoints will begin with https://api.themoviedb.org/3/. The part that comes after this defines which type of search you are doing.
All requests from the API need to include an API Token in the Headers. It will look something like this:
let h = new Headers( 'Authorization': 'Bearer eyJhbGciOiJIUzI1NiIsInR5cCI6IkpXVCJ9...');let req = new Request(url, { headers: h, method: 'GET'})The actual token is preceded by the string “Bearer ”.
TMDB Images
Section titled “TMDB Images”Depending on whether you are trying to get an image for a movie or an actor there are different properties that hold the name of the image.
The URL for all images starts with https://image.tmdb.org/t/p/. Then you need to specify one of the specific widths. Different kinds of images are available in different sizes. An example size is w185. After the base url and the width property, you need to add the
To get a list of the possible values for the width property make a call to this URL- https://api.themoviedb.org/3/configuration. Put your own API Token in the Headers as a bearer token.
Common API Endpoints
Section titled “Common API Endpoints”https://developers.themoviedb.org/3/movies reference for getting details about a movie based on its ID.
https://developers.themoviedb.org/3/search/search-movies reference for doing a search for movies based on a keyword that matches against the title of the movie.
https://developers.themoviedb.org/3/search/search-tv-shows reference for doing a search for tv shows based on a keyword that matches against the title of the show.
https://developers.themoviedb.org/3/search/search-people reference for doing a search for people based on a string that matches against their name.
https://developers.themoviedb.org/3/people/get-person-combined-credits reference for doing a search for all TV Shows and Movies that are connected with an actor.
https://developers.themoviedb.org/3/people/get-person-movie-credits reference for doing a search for all Movies that are connected with an actor.
Datasets about Movies
Section titled “Datasets about Movies”When you make API searches for Actors, Movies, and TV Shows, the resulting JSON data will have an array called results. Inside that array will be a series of objects. These objects could contain objects that are referencing either a TV Show or a Movie. It is important to note the distinction between them because they have some different properties. Watch for a property called media_type set to either movie or tv. You can also watch for release_date vs first_air_date. The release_date is for movies. TV Shows have name properties and Movies have title properties.
TMBD intro
OpenWeather API
Section titled “OpenWeather API”The OpenWeather API is another API, with a free usage tier, that you can use to get the current weather, historical weather data, and forecasts. The API page shows the MANY different APIs that you can use.
Like most APIs, you need to sign up for a key before you can start using the data.
The API Key needs to be included, for any API call, in the querystring as the value of the appid property.
let url = `http://api.openweathermap.org/data/2.5/forecast?id=524901&appid=${APIKEY}`;//the actual URL will vary depending on whether you are using the free or paid service//and depending on which API you are calling.A good API to start with is the one called ONE CALL 3.0.
The One Call API provides the following weather data for any geographical coordinates:
- Current weather
- Minute forecast for 1 hour
- Hourly forecast for 48 hours
- Daily forecast for 8 days
- National weather alerts
- Historical weather data for 40+ years back (since January 1, 1979)
OpenWeather API
APIMocker
Section titled “APIMocker”The https://apimocker.com/ is a website built by Brad Traversy of Traversy Media (You have likely watched some of his YouTube videos). You can use it to fetch test data about Users, Posts, Todos, or Comments.
//sample URLconst usersUrl = `https://apimocker.com/users`;//replace the "users" part with "posts", "todos", or "comments"//an id can be added as a value in the URLconst userUrl = 'https://apimocker.com/users/8';//to get a single userYou can also add searching, filtering, actual posting, pagination, validation, simulated delays, and simulated errors.
See the website for examples of each.
The Rate limits for usage are:
- 100 writes/day (POST, PUT, PATCH, DELETE)
- 1000 reads/15 minutes per IP address
Random Data API
Section titled “Random Data API”This is a great Canadian-made free API that let’s you generate lots of data for testing purposes. This includes user data. Website
All API calls use a base URL of https://random-data-api.com/api/v2/
Then add the resource that you want - /users, /addresses, /banks, /beers, /appliances, /credit_cards, or /blood_types.
Then to your queryString add size=20 where the value is the number of objects you want in the JSON returned. While JSON is the default return type, you can ask for XML by adding response_type=xml
to the queryString.
Learn the Random Data API
DummyJSON
Section titled “DummyJSON”Another API that is similar to JSONPlaceHolder, is https://dummyjson.com/. It has an even longer list of endpoints, with additional parameters and a much bigger dataset. With DummyJSON, we can simulate logins, and authorized requests for different kinds of data.
The DummyJSON API can provide sample data for the following subjects:
- Users -
https://dummyjson.com/users - Products -
https://dummyjson.com/products - Carts -
https://dummyjson.com/carts - Recipes -
https://dummyjson.com/recipes - Posts -
https://dummyjson.com/posts - Comments -
https://dummyjson.com/users - Todos -
https://dummyjson.com/todos - Quotes -
https://dummyjson.com/quotes - Dynamic Images -
https://dummyjson.com/image/300x200 - As well as Authorization endpoints
https://dummyjson.com/auth/loginhttps://dummyjson.com/auth/mehttps://dummyjson.com/auth/refresh
Each of the subject URLs can also take an id integer at the end of the path, or /search?q= to be able to search for a matching object. Eg: https://dummyjson.com/products/12 or https://dummyjson.com/products/search?q=phone.
If you want to login, you will need to pass a valid username and password to the /auth/login endpoint. To find a valid username and password, just visit the /users url. There are over 200 users and you can use any of the username and password combos from any user in the list.
After logging in you will get a response object like the following example.
{ "id": 1, "username": "emilys", "email": "emily.johnson@x.dummyjson.com", "firstName": "Emily", "lastName": "Johnson", "gender": "female", "image": "https://dummyjson.com/icon/emilys/128", "accessToken": "eyJhbGciOiJIUzI1NiIsInR5cCI6IkpXVCJ9...", "refreshToken": "eyJhbGciOiJIUzI1NiIsInR5cCI6IkpXVCJ9..."}In the response object, the accessToken is the string that we need to save, so that we can request authorized items from the API. To get an authorized endpoint, all we need to is:
- Add
/authas the first part of the URL path. Eg:https://dummyjson.com/auth/products. - Add an
authorizationheader to the request. It’s value will be"Bearer "plus theaccessTokenfrom the login response.
RoboHash API
Section titled “RoboHash API”The Robohash API is a separate API but it used by the Random Data API as the source for avatar images within the users dataset.
The API accepts any string as a parameter. That string gets hashed into a repeatable value, so that each time you pass the same string you will get the same result.
There are parameters that you pass in the query string and based on those values, the API will return a robot, an alien, a monster, or a kitten image that can be used as an avatar.
RoboHash API
Generating Data
Section titled “Generating Data”Another approach that we can use when developing a site is to create our own JSON file that we can save inside our project folder and make fetch calls for that file.
While this may feel like an onerous task, with the help of AI Chat tools, it is actually very simple.
Just write an AI prompt that clearly defines the fields that you want, their datatypes, and how many objects you want. Be sure to include a unique id field and a data format, like JSON or XML, for the generated data.
Here is a sample prompt for you to test.
Please create some sample JSON data about characters from the TV show "Rick and Morty". Generate a single object with a property called "results", which will hold an array of eight objects. Each object should contain a uuid field, a fullname field, and four other fields that are String, Number, Boolean, and Date values.Using that prompt, here is the sample data ChatGPT gave me.
{ "results": [ { "uuid": "6a1a6d4e-bd65-4b27-8e94-12a24e4ec6c2", "fullname": "Rick Sanchez", "species": "Human", "age": 70, "isAlive": true, "lastSeen": "2025-07-18T14:30:00Z" }, { "uuid": "0fcb7c7e-5092-43e0-a9d0-82a11f53cb2d", "fullname": "Morty Smith", "species": "Human", "age": 14, "isAlive": true, "lastSeen": "2025-08-02T10:15:00Z" }, { "uuid": "51a7ac71-71ab-4a25-bcfb-364755b9d6cf", "fullname": "Summer Smith", "species": "Human", "age": 17, "isAlive": true, "lastSeen": "2025-06-11T18:45:00Z" }, { "uuid": "f7e018e2-bdd9-4d53-872b-4f06f0b9ad92", "fullname": "Beth Smith", "species": "Human", "age": 35, "isAlive": true, "lastSeen": "2025-05-28T22:10:00Z" }, { "uuid": "d515fd42-fd73-4c50-b91a-5c345529f79f", "fullname": "Jerry Smith", "species": "Human", "age": 35, "isAlive": true, "lastSeen": "2025-07-09T09:50:00Z" }, { "uuid": "f69fd2a2-089a-4f26-b6e2-0a3c2d2b92cb", "fullname": "Birdperson", "species": "Bird-Person", "age": 40, "isAlive": false, "lastSeen": "2024-12-25T12:00:00Z" }, { "uuid": "8f4f33a3-bf6b-4b0c-a221-dc3ff872af73", "fullname": "Mr. Meeseeks", "species": "Meeseeks", "age": 3, "isAlive": false, "lastSeen": "2025-01-14T07:00:00Z" }, { "uuid": "4fbe1a5e-1b1e-47c0-95dc-2e6c0a637123", "fullname": "Squanchy", "species": "Cat-like Alien", "age": 45, "isAlive": true, "lastSeen": "2025-08-01T19:20:00Z" } ]}Try it for yourself with any AI Chat tool. Then try to create your own custom JSON or XML data.
Google Maps
Section titled “Google Maps”The Google Maps API for Web has versions for Android, iOS, and the web. While you do need to register an account and include a payment method, it has a free usage tier for accessing map data and directions.
The Google API is a bit different than the other ones that we have looked at so far.
It still works by sending HTTP Requests and handling HTTP Responses.
However, there is also a Google Maps script that we have to use, and you have to have an account that you register and projects that you define and manage through a web dashboard console.
First you would register for an account with Google Maps.
Then you would create a project in the Dashboard console. Here are the instructions for setting up your account and project.
After the setup through Google is completed, then you can start building your website.
You need to include a link to the Google Maps script in your page(s).
<script async defer src="https://maps.googleapis.com/maps/api/js?key=YOUR_API_KEY&callback=initMap"></script>Put your own API KEY in the link to the script.
Finally, you will use the functions and objects defined in the Google Maps API script to build, move, zoom, and interact with the map images. So, instead of using fetch() to get the images, we call on the Google Maps API methods and them them figure out which map image tiles should be loaded in the browser.
Here is the Getting Started script introduction for working with Google Maps in your JS files.
Their basic script looks like this:
let map;
function initMap() {  map = new google.maps.Map(document.getElementById('map'), {    center: { lat: -34.397, lng: 150.644 },    zoom: 8,  });}
window.initMap = initMap;
Note that map is a global variable. It will be the map object that you use for adding any event listeners or changing properties of the map.
They are calling a method new google.maps.Map() to get started. They also add the function initMap as a property of the window object and with the same name.
This means that in the google maps JS file that you loaded before writing your own script there is a namespace object called google. It has a property called maps and inside maps is a function
called Map.
Roughly it would look like this:
const google = { maps: { Map: function (DOMElement, props) { //creates the Map object and returns a reference to it //Do NOT call this method until after the DOMContentLoaded event }, },};The Map() function needs to be passed a DOMElement (usually a <div>) which will be where on the page your Map will be appended. Use CSS to size your containing element. Always set the height for your <div> to 100% in your CSS.
Map also accepts a props object. There are default values for many properties but the required ones are center and zoom. center is an object with lat and lng properties. These are the latitude and longitude values that will be used as the center of the map. The zoom value is an integer between 1 and 17. It indicates how much to zoom in. 1 showing the whole world. 17 showing a building or two.
You can rename the function if you want. You just need to change the
callback=initMapvalue in the querystring that is part of thesrcof the<script>tag used to load the google maps JS.
Intro to Google Maps
Service Workers
Section titled “Service Workers”A recent feature added in browsers are Service Workers. These are scripts that run in the browser and act like Proxy Servers. They handle all the outgoing and incoming traffic to and from your browser for a specific domain. They are able to cache copies of files in case the browser is offline.
If you need to build a web app that can still run some functionality when offline then you need a Service Worker.
If you need to build a web app that can coordinate user activities across multiple tabs then you probably need a Service Worker.
If you want to manage caching of files on the client-side for improved performance then you should have a Service Worker.
We will be exploring Service Workers in depth next semester.
Adding Service Workers to a Website
Section titled “Adding Service Workers to a Website”When you add a service worker from your script, it will typically manage all the webpages loaded from that same origin. While it is possible to use multiple service workers for a single website by putting them each in charge of their own folders (scope), this can be difficult to manage.
Your service worker will be a single JS file called sw.js, placed at the root of your website.
From your own main.js file, you can register the service worker to be in control of the web pages for the current origin. Any time a web page from that origin is loaded on the user’s browser, the service worker will automatically start up and oversee all communications from the web page to any web server.
if ('serviceWorker' in navigator) { //always check for support first navigator.serviceWorker .register('sw.js') .then(() => { //successfully registered the service worker }) .catch((err) => { //failed to register the worker. //likely a script error in the worker. });}Basic Events in Service Workers
Section titled “Basic Events in Service Workers”Inside the Service worker file sw.js there are four events that we will listen for - install, activate, fetch, and message.
Since service workers are a different execution context than web pages themselves, they don’t use the window or document objects. To add the event listeners we use self to refer to the worker.
self.addEventListener('install', (ev) => {  console.log('service worker has been installed.');});
self.addEventListener('activate', (ev) => {  console.log('service worker has been activated.');});
self.addEventListener('fetch', (ev) => {  console.log('web page has requested a file.');  //this event fires for EVERY FILE REQUEST  // images, html, json, css, fonts, etc});
self.addEventListener('message', (ev) => {  console.log('service worker has received a message.');});
If you want to learn more about Service Workers you can watch this playlist. (15 videos)
If you want to learn more about Messaging between windows, tabs, and service workers, then you can watch this playlist. (3 videos)
See the notes in week 13 about the Cache API to learn about how your Service Worker could save and manage files locally.
Note: There is a library from Google called WorkBox which is commonly used to manage service workers and their caching of files. Learn more here
Security
Section titled “Security”Security for Web Apps is a broad topic with lots to learn. This week we will be talking about a number of the elements that you should consider when designing the security for your app.
Cookies
Section titled “Cookies”Cookies have been available as Strings that get created and passed with HTTP Requests and Responses since the early days of the web. In the Requests and Responses, they are sent as a Header value.
Practically every request that the browser makes for any file will have the cookie header sent along with the request.
In the browser they are stored inside document.cookie. We will use document.cookie to both get and set the values of cookies.
The format of the cookie string is like this:
'key=value;path=/;domain=localhost;max-age=30000;secure;samesite';Just like localStorage there is a key and a value. The value must be URL encoded, just like values you put in the queryString.
Be default, cookies apply to the root folder of your website. However we can add to this path value to restrict the cookies to a smaller part of our website.
Domain
Section titled “Domain”By default, the domain value will be the domain of the HTML file. However, we can restrict it further to a specific subdomain if we want.
Max-Age
Section titled “Max-Age”The max-age part of the cookie String will be the number of seconds that the cookie is to be considered valid.
Secure
Section titled “Secure”If the secure value exists it means the cookie can only be accessed or set over https.
Same-site
Section titled “Same-site”If the same-site value exists then the cookie is only to be sent with requests for files that are going to the same domain as the original HTML file.
MDN Reference for document.cookie
Understanding Browser Cookies
Fetch, CORS, and Cookies
Headers
Section titled “Headers”The full notes about how to work with Headers are back in Module 10.
Headers are included as a topic under security because you will often have to include your API Key as a header. It depends on who designed the API. They might want the API Key in the querystring. They might want it as a Header entry. They might want a value in the querystring plus a header entry.
When you start to work with JSON Web Tokens (JWT), you will be passing a JSON String that has been encoded as a base-64 string through a header called Authentication. You will also be reading the header when it gets sent from the server.
The Authentication server is also used, less commonly, for other types of authorization methods like username-password.
Base-64
Content Security Policy
Section titled “Content Security Policy”There is a meta tag that you should put into ALL your websites and web apps and hybrid apps. It is a security feature to protect your users.
It has the http-equiv attribute set to Content-Security-Policy and then a content attribute with all the possible values of where the browser is allowed to load different types of resources
from.
<meta http-equiv="Content-Security-Policy" content="default-src https: ;" />The value inside content is broken up into different categories like default-src, img-src, style-src, font-src, media-src, and connect-src. After each category name you put one or more values for allowed sources for that type of content. After each source list you put a semi-colon.
The http-equiv attribute means that this is actually a header that could be sent from the server too.
See the CSP website for the full list of categories and values. CSP website official reference
CSP Introduction
You should put this meta tag into EVERY webpage you build.
When things go wrong with your Content-Security-Policy you will see notifications in the JavaScript console in the browser.
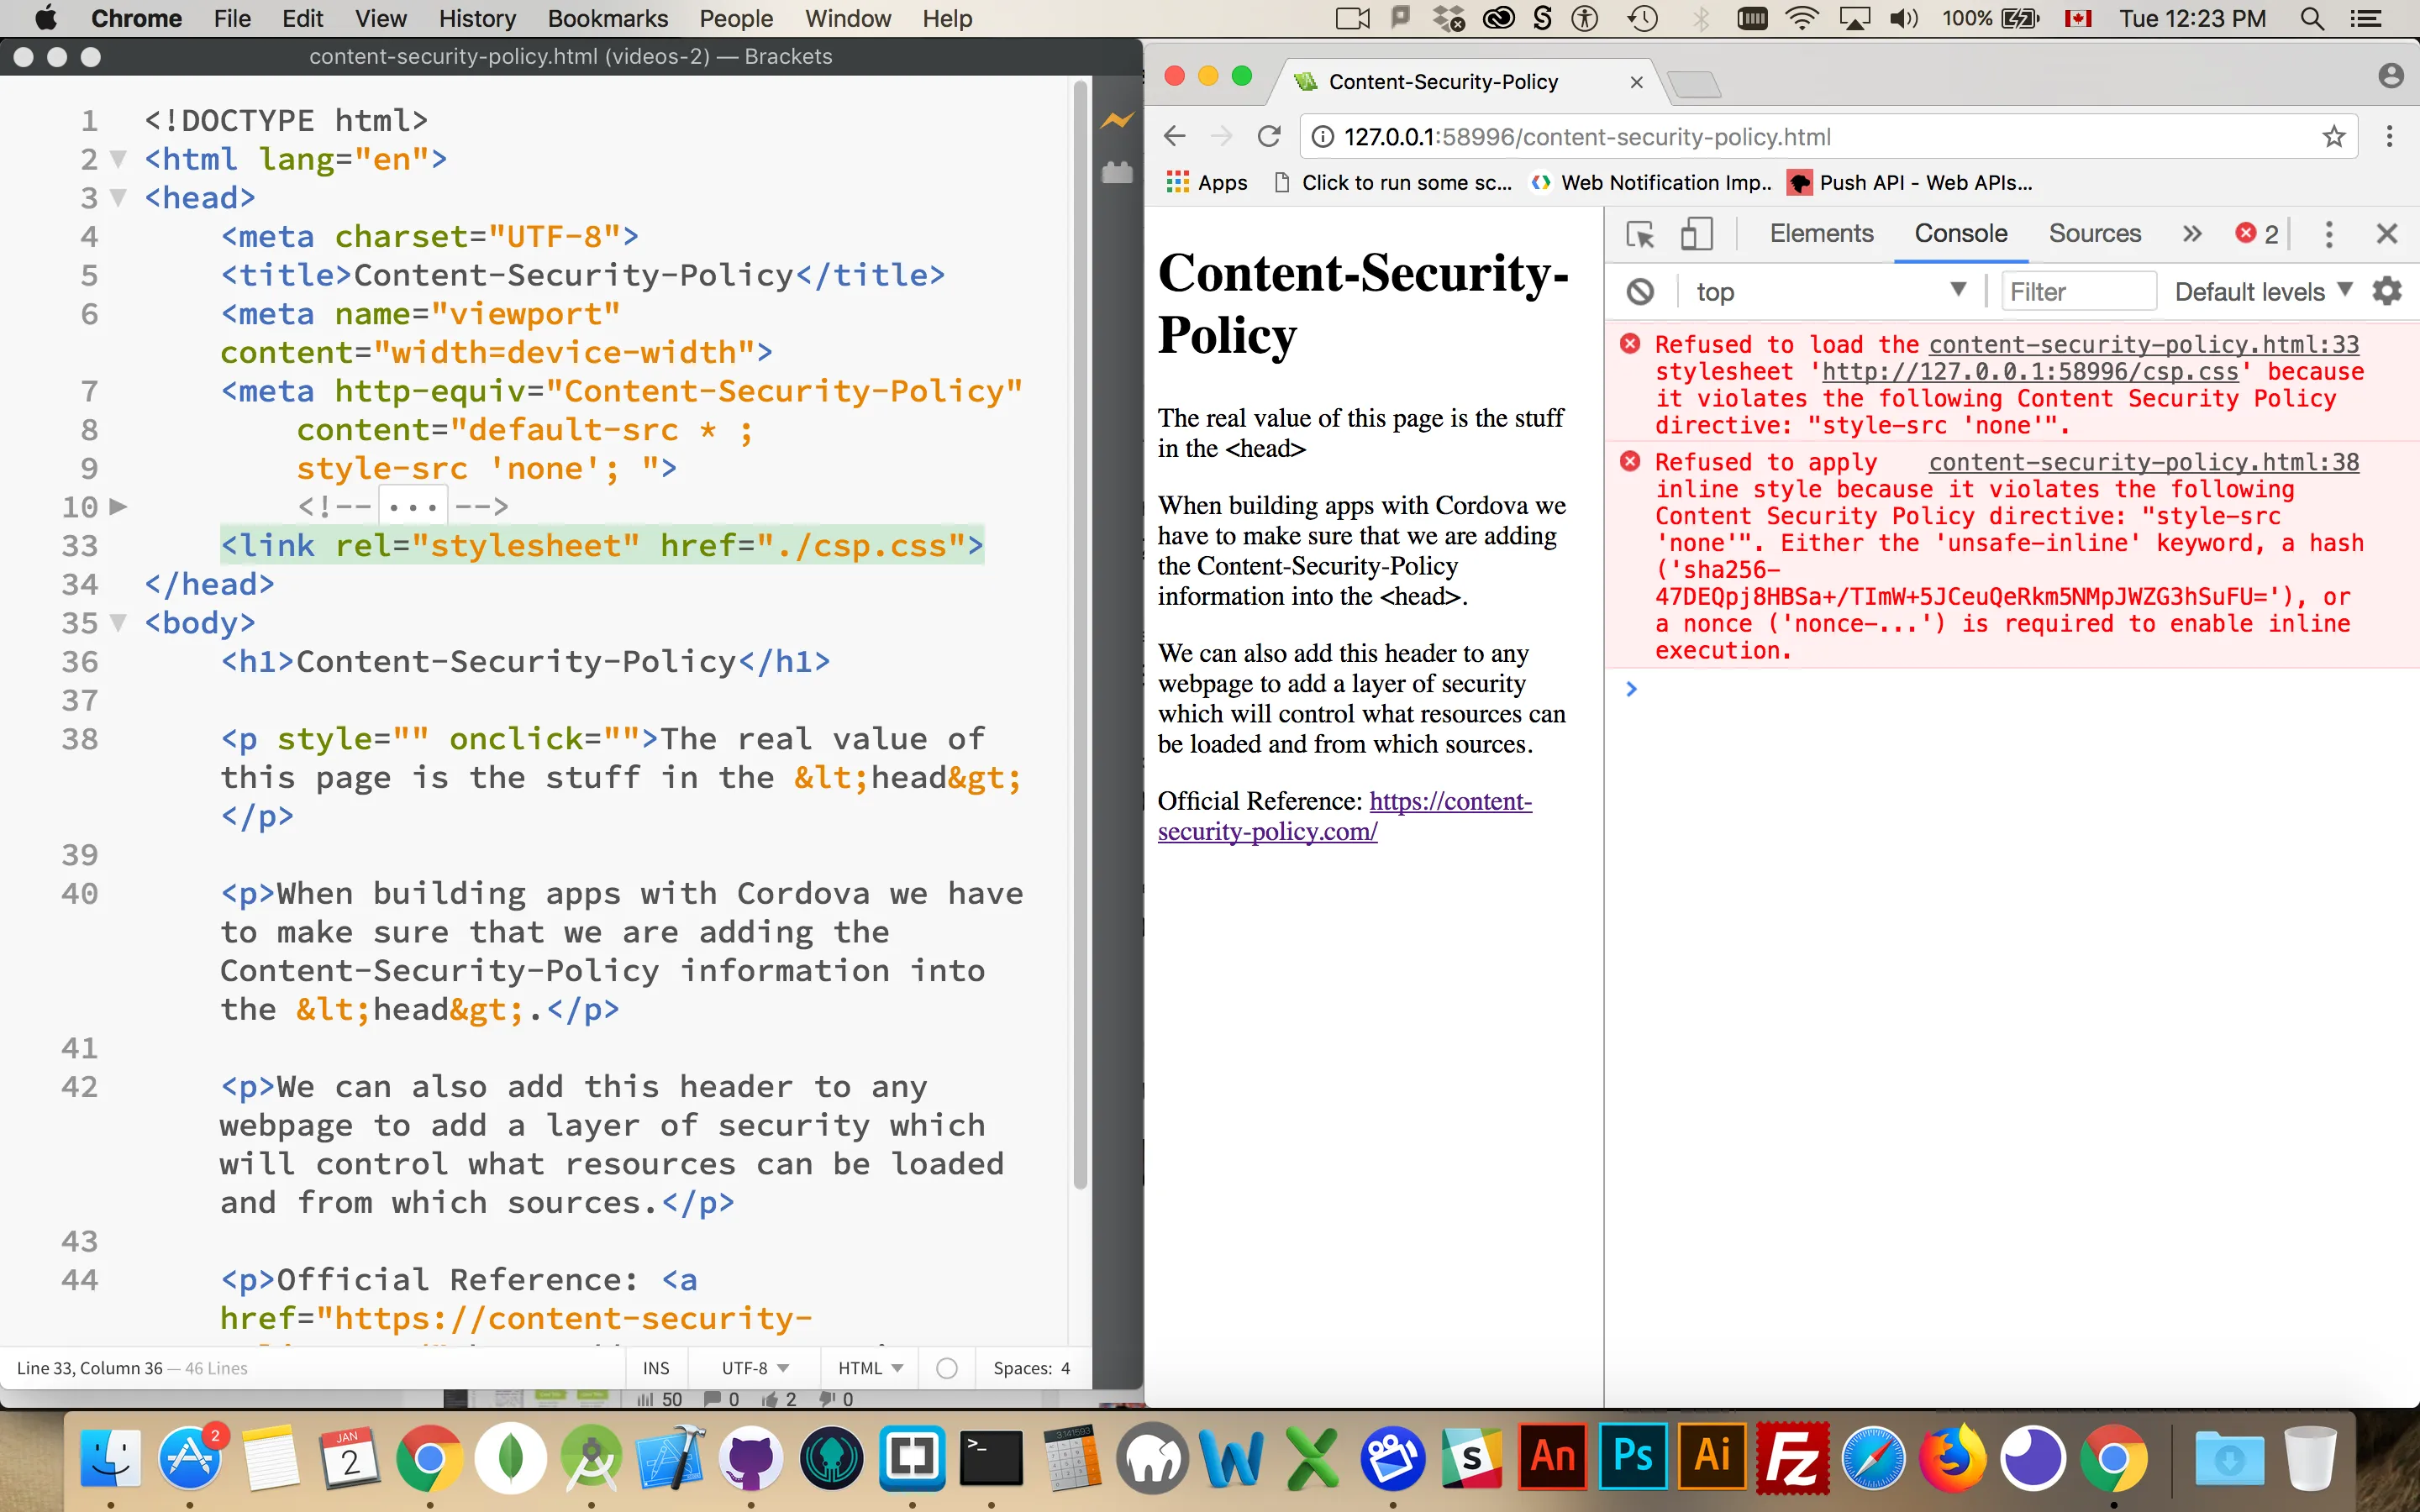
In this screenshot it is saying that it cannot load the stylesheet because the style-src is set to "none".
When you run into problems with the CSP, you should just respond to each error separately by adding a new category or updating a category to include a specific location. While you can just put everything into default and accept anything this defeats the purpose and provides no security for your users.
Using the Script integrity Attribute
Section titled “Using the Script integrity Attribute”With script tags, we can add an integrity attribute which helps protect our users further. This attribute value also needs to be added to your CSP tag.
Script Integrity
CORS stands for Cross-Origin Resource Sharing. It refers to the process by which the browser can make HTTP Requests to load an HTML file from one domain and then other things like images, fonts, stylesheets, and scripts from different domains.
If the browser is making the request based on what it read in an HTML or CSS file then this can be done freely.
If the cross-domain request is coming from some JavaScript code then there are restrictions in place.
JavaScript can use the Fetch API or XMLHttpRequest objects to make requests for resources like XML, JSON, text, images, stylesheets, fonts, videos, audio files, etc. However, we have to follow a restrictive list of rules to be able to make those requests.
Headers
Section titled “Headers”When you configure the fetch( ) call with the Request and Headers objects to request a resource on a different server the only predefined headers that can be set are: Accept, Content-Type, Accept-Language, and Content-Language. No other headers can be altered for a CORS request. You can add your own custom headers like X-Steve-Is-Awesome without impacting CORS.
Accept tells the server what types of files you are willing to accept as a response. Content-type tells the server what type of file you are sending. The only three values allowed for Content-Type are text/plain, multipart/form-data, or x-www-form-urlencoded.
When using the Fetch API we can actually set the CORS mode for the request. Basically we are going to tell the server that we do or do not want to make a cross-domain request.
Inside our Request options we define the mode like this:
let options = { method: 'GET', mode: 'cors',};The mode can be "cors", "same-origin", or "no-cors". If we set it to "cors" then we are telling the browser to look for the proper permissions to come back from the remote webserver telling us that CORS is allowed. If we set it to "same-origin" then we are telling the browser that it should prevent the JavaScript from making calls to any domain except the one where the HTML came from. "no-cors" tries to make an opaque attempt to get external sources but does not currently work within the global scope of the page.
Cross-Origin Fetches
Behind the Scenes
Section titled “Behind the Scenes”When you make a CORS AJAX call from your JavaScript code there are actually two requests being made. An initial request called a pre-flight request gets sent from the browser to the server. This request includes a header providing the domain from which the request is being made.
For the communication between the server and the browser to finish properly, the server needs to respond to the initial preflight request with a Response that includes a header called Access-Control-Allow-Origin. The value for this header must match exactly your URL or be set to a wildcard.
With Apache as your webserver, we can create a settings file called .htaccess and inside that file add this line:
Header set Access-Control-Allow-Origin "*"This will create the required header to allow for cross origin requests.
The .htaccess file must be in the folder or a parent folder for the resource being requested.
Even if you are not using Apache as your web server, the Access-Control-Allow-Origin header still needs to be sent from the server to the client.
There is also an Access-Control-Allow-Headers header that can hold a list of the headers which are allowed to be sent from the browser to the server when the actual full HTTP Request is sent (after the pre-flight request).
The Access-Control-Allow-Credentials header holds a true value or is omitted. If the Request.credentials property is set to include, then this header must be set to true or the browser will not be allowed to access the full Response if cookies, authorization headers, or TLS client certificates are included.
The Access-Control-Allow-Methods header holds a list of allowed methods that can be used for the full request after the pre-flight request.
Access-Control-Allow-Headers MDN reference
What Gets Restricted
Section titled “What Gets Restricted”There are actually quite a few things that can get restricted when requesting resources over CORS. For our immediate purposes, it is important to note that a webpage from edumedia.ca making a request to darksky.net would not be allowed to use the JSON data. This happens because the HTML file and the JSON file are coming from different servers and the server providing the JSON is NOT setting that Access-Control-Allow-Origin header for us.
If you set the mode to "same-origin" or "no-cors" then the request would be entirely rejected.
If you set the mode to "cors" then the request would be sent and the JSON data returned but we would not be allowed to use the data in our JavaScript.
Resolving fetch cors
And here is a great article by Lydia Hallie with illustrations to show how CORS restrictions work.
Authentication and JWT
Section titled “Authentication and JWT”When you need to do things like pass a username and password along with a fetch request, there are a few things you can do.
JWT stands for JSON Web Tokens. It is a technology that is used to track and authenticate users. The jwt.io website explains how it works and let’s us generate sample tokens.
An example token would look like this:
eyJhbGciOiJIUzI1NiIsInR5cCI6IkpXVCJ9.eyJzdWIiOiIxMjM0NTY3ODkwIiwibmFtZSI6IkpvaG4gRG9lIiwiYWRtaW4iOnRydWUsImlhdCI6MTUxNjIzOTAyMn0.KMUFsIDTnFmyG3nMiGM6H9FNFUROf3wh7SmqJp-QV30It has three parts, Header, Payload, and Signature, separated by a period. The payload is where we can save identifying information about the user, NOT secure things like passwords.
The first two parts are created from JSON objects that are then base-64 encoded. The string above is created from these two JSON objects.
{ "alg": "HS256", "typ": "JWT"}{ "sub": "1234567890", "name": "John Doe", "admin": true, "iat": 1516239022}The third part of the token is the base-64 encoded version of a string used to encrypt the token.
The base-64 encoded token is a String that gets saved in a Header called Authorization. It would look like this:
Request(url, { method: 'get', headers: { Authorization: 'Bearer eyJhbGciOiJIUzI1NiIsInR5cCI6IkpXVCJ9.eyJzdWIiOiIxMjM0NTY3ODkwIiwibmFtZSI6IkpvaG4gRG9lIiwiYWRtaW4iOnRydWUsImlhdCI6MTUxNjIzOTAyMn0.KMUFsIDTnFmyG3nMiGM6H9FNFUROf3wh7SmqJp-QV30', },});Note the word “Bearer ” that is written in front of the actual JWT token. This is required.
The following videos will be very useful to you later on when you start using JWT in MAD9124 and need to accept tokens on the client side.
Basic Authentication with Fetch
Tokens has become the most common way to authenticate with fetch and API calls. This first video explains how tokens can be passed through fetch.
Fetch with Tokens
This next video shows the full life cycle of JWT (JavaScript Web Tokens) on the client and server. The Server-side part of this will be discussed in detail in MAD9124.
JWT lifecycle client and server
An acronym that you will see occasionally when reading about web security is 2FA. It stands for Two-Factor Authentication.
It is a method for making your apps more resilient to attacks on your users. Basically, you have your app ask the user for a username and a password.
After you validate their username password combination on the server, then you send a randomly generated code to either their email or via SMS as a text message to their phone.
This way the person trying to access the site has to know the username and password AND they must possess the device and/or have access to the person’s email account.
Recently, there has been more usage, of Authenticator apps. It is the authenticator app that is responsible for generating the random code and then telling both the site and the user what the code is. The user then has to enter the code and send it to the web server. The web server will validate that the code sent by the user is the same one that it got from the Authenticator.